Adding an API to my grind and brew coffee machine to make it smart

This post will guide you through on how to connect a dumb Philips grind & brew hd7762 coffee machine to your privacy first home automation solution based on home assistant and esphome. Most important, with a high Wife Acceptance Factor.
Pre-requierments
My past experience with microcontrollers have been forced by my friend Peter to write LUA code for a rgb controller. Regarding electronics, that was my hobby before my first computer 1996 but on a basic level back then. But I am sure if there is a intresst and some time, this is doable for most of the people.
Hardware
- Philips Grind & Brew HD7762
- ESP32 devkit c v4
- I used ESP32 devkit c v4 30-pin but almost any ESP32 will do if you use the right pin’s.
- Non-contact liquid sensor from CQRobot, other sensors can also be used to be put inside of the tank.
- Not needed if you don’t care if the coffee machine will grind & brew with out water in the tank.
- cables & usb power adapter.
Repository
The story
A couple of years ago, I started with a wake-up routine with my privacy first home automation. Waking up to an emulated sunrise with red, transforming to yellow and then to normal light over a period of fifteen minutes and then, the TV kicking on the circle of life from the Lion king movie. I could start up every morning with a smile and less grumpy.
So, I started to think, what’s missing to make my mornings even more awesome. The idea with having fresh coffee would be a great. The only problem I had then was the time, then came the pandemic, as jay-z would say, I got 99 problems, but a time ain’t one.
I already had some wires, ESP’s and relays already but I was unsure how the inside of the coffee machine was wired. I was speaking to my friend Peter over the phone that is so deep into the electronics that it is insane, and I told him about what I was planning to do. He said that I might not need a relay to do this and could use the ESP to do this depending on the voltage. He found the service manual online and was checking it but could not find any details about the circuit board. We started to disassemble the coffee machine without me really thinking it through.
One hour later, I measured with the multimeter to see where to hook into the circuit and we identified that the voltage is 4.3v and Peter told me that the ESP only supports 3.6V. We decided to test it out anyway and the sacrifice an ESP if it would get killed during the test as other have successfully been running even with 5V. The benefit of a successful test would be one less component (the relay). The circuit board was a lot denser than I thought, and I have not soldered in 20 years, so we agreed that we would meet up to get some help and learn how to do it myself. It took a month before we did that due to the pandemic. Now, working from home and no coffee for a month was challenging.
Meanwhile, I ordered the Non-contact liquid sensor from CQRobot to be able to detect water through the plastic container (it also works through glass). With the sensor in place, I could make sure to not turn on the grinding process if the machine was not prepared. Acter a couple of weeks, I got sensor and started to play around with it and identifying exactly where to put the sensor. It’s a really cool one and works by using the sensing capacitance of water and gives back a binary value as a result.
So, after a month when we met and started to solder the cables to ground, the “turn on” button and the “start grinding” button. We did a test with the on button and ground connected to see if we needed a relay or not, eventually a new ESP if it would get burned during the test. It turned out that the ESP could manage it and you can see it turning on the coffee machine (the red light on the circuit).
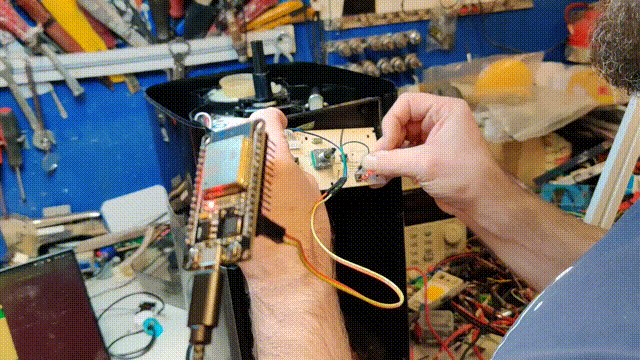
Testing the code on the ESP32 to see if we need a relay or not
To test the ESP32 if it can handle the 4.3V without burn, the following code was deployed on the ESP through arduino studio before we started to solder.
|
|
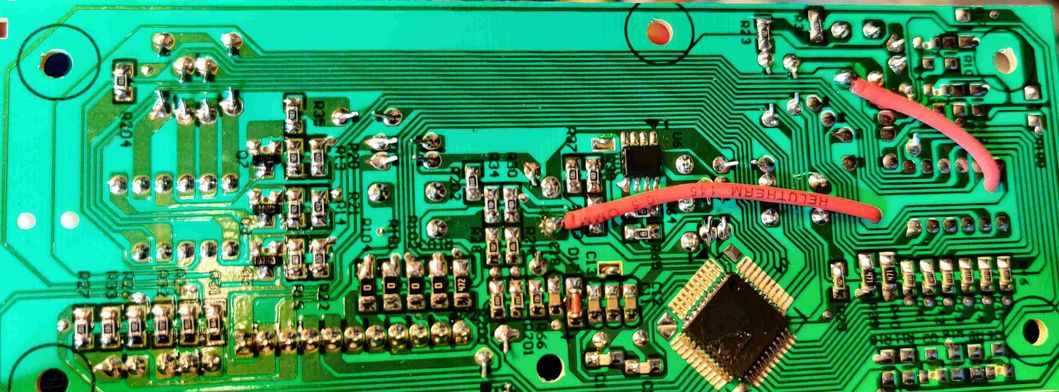
The curcit board of the Philips Grind & Brew HD7762 with the cables soldered to grind and on microswitches
The right solder joint is the on microswitch and the left one is the grind microswitch and ground was connected here
So, I started to evolve the code and halfway there I bumped over an article in my rss reader about a home assistant project built upon esphome. I realized I was looking into that project a while ago but forgot the existence. Even if I have invested some time into the code, I realized that I would never come close to the features esphome. It is tightly integrated with home assistant, the possibility to update the code with the OTA (Over The Air, no need for a usb cable to debug or deploy) and a real time event source api for state & log updates and a rest api, both over json. So, I ported the code to the esphome yaml format and finished it. Bellow you can see what PIN’s I used for the ESP32 30-pinout.
The 30 pins ESP32 I use is a 30 pin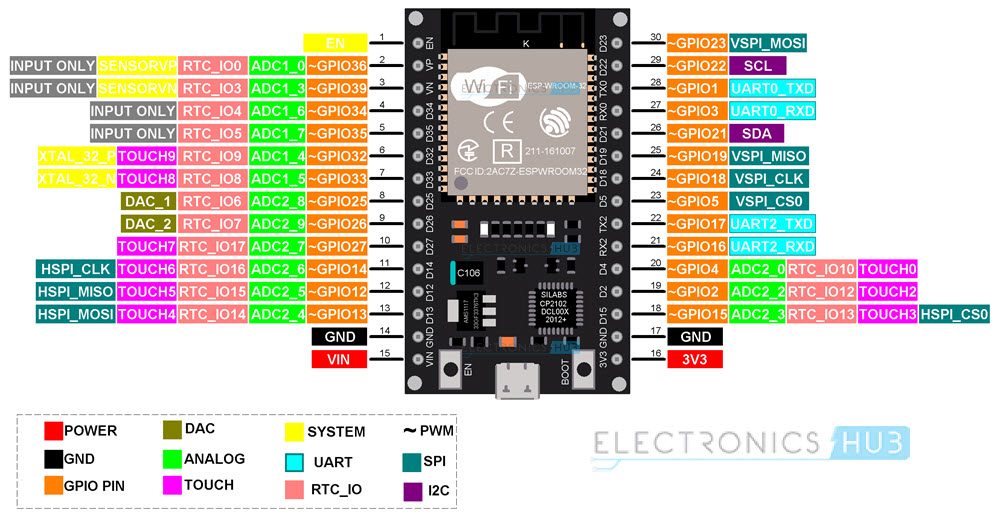
The ESP32 pinout
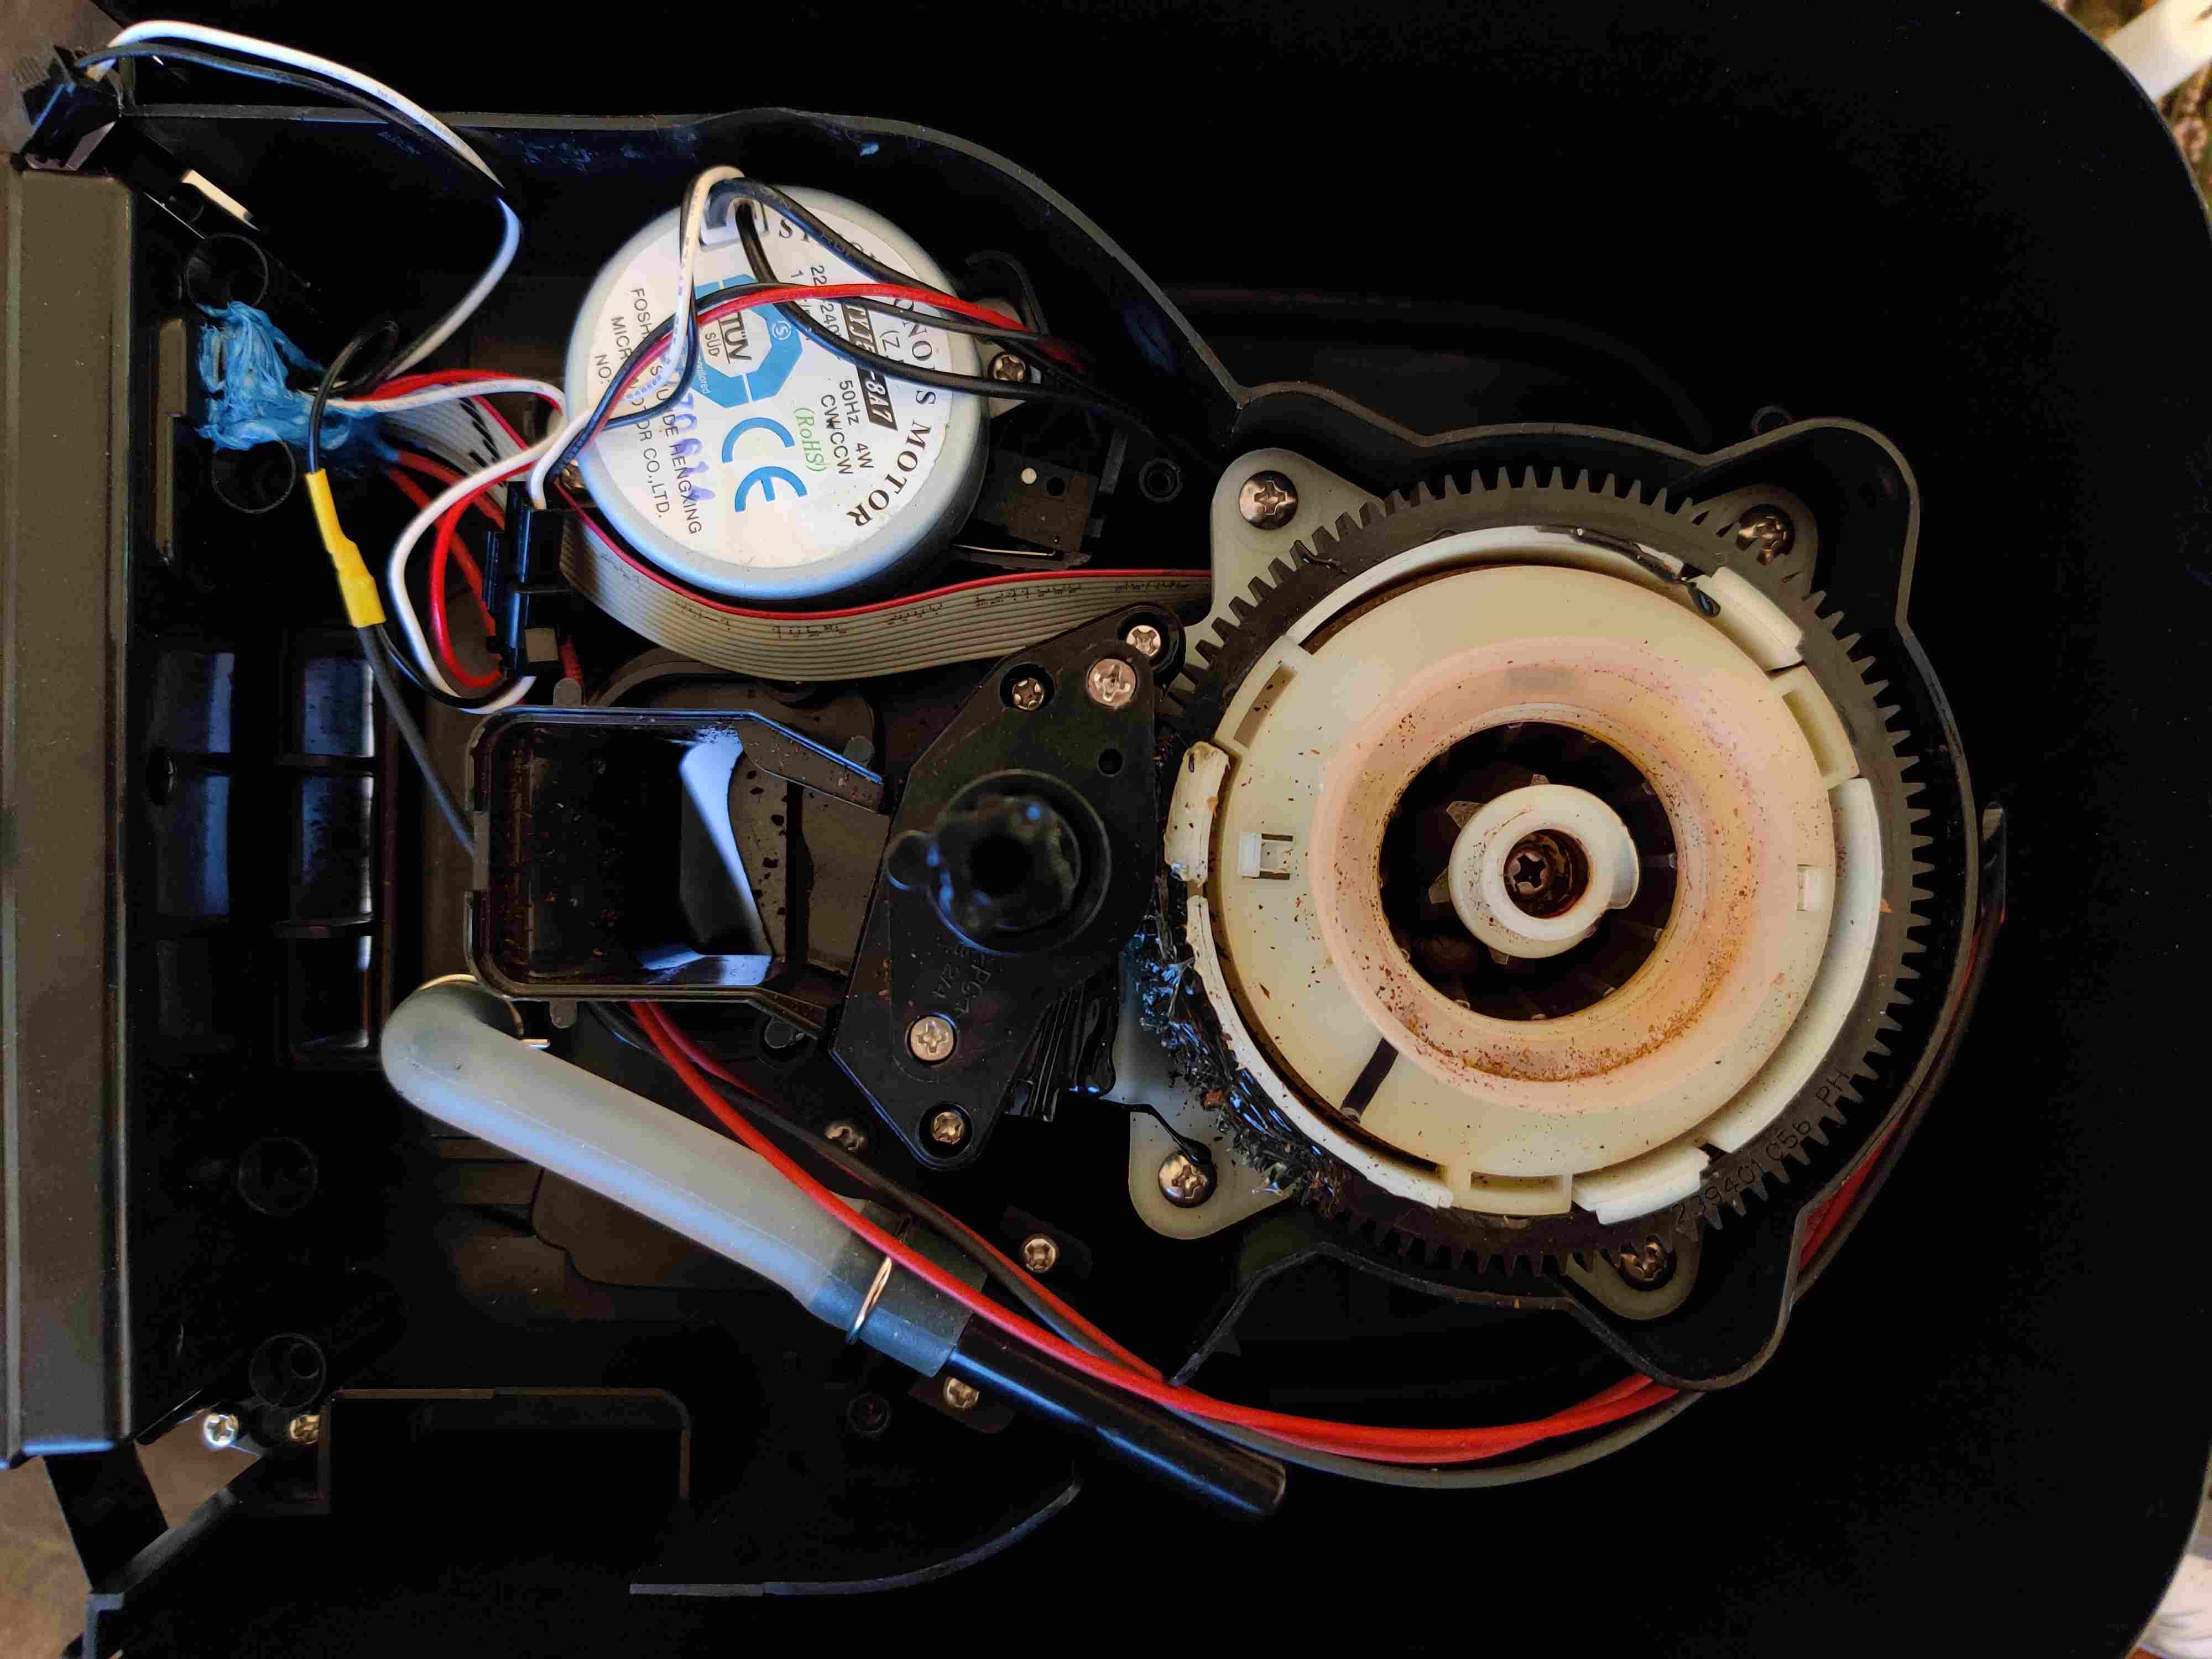
To make sure it would get a high Wife Acceptance Factor I also 3D printed a case for the ESP and hided it. The sensor is on the side to quickly identify if it’s prepared without touching it as the red LED will be turned on when there is water in the tank.
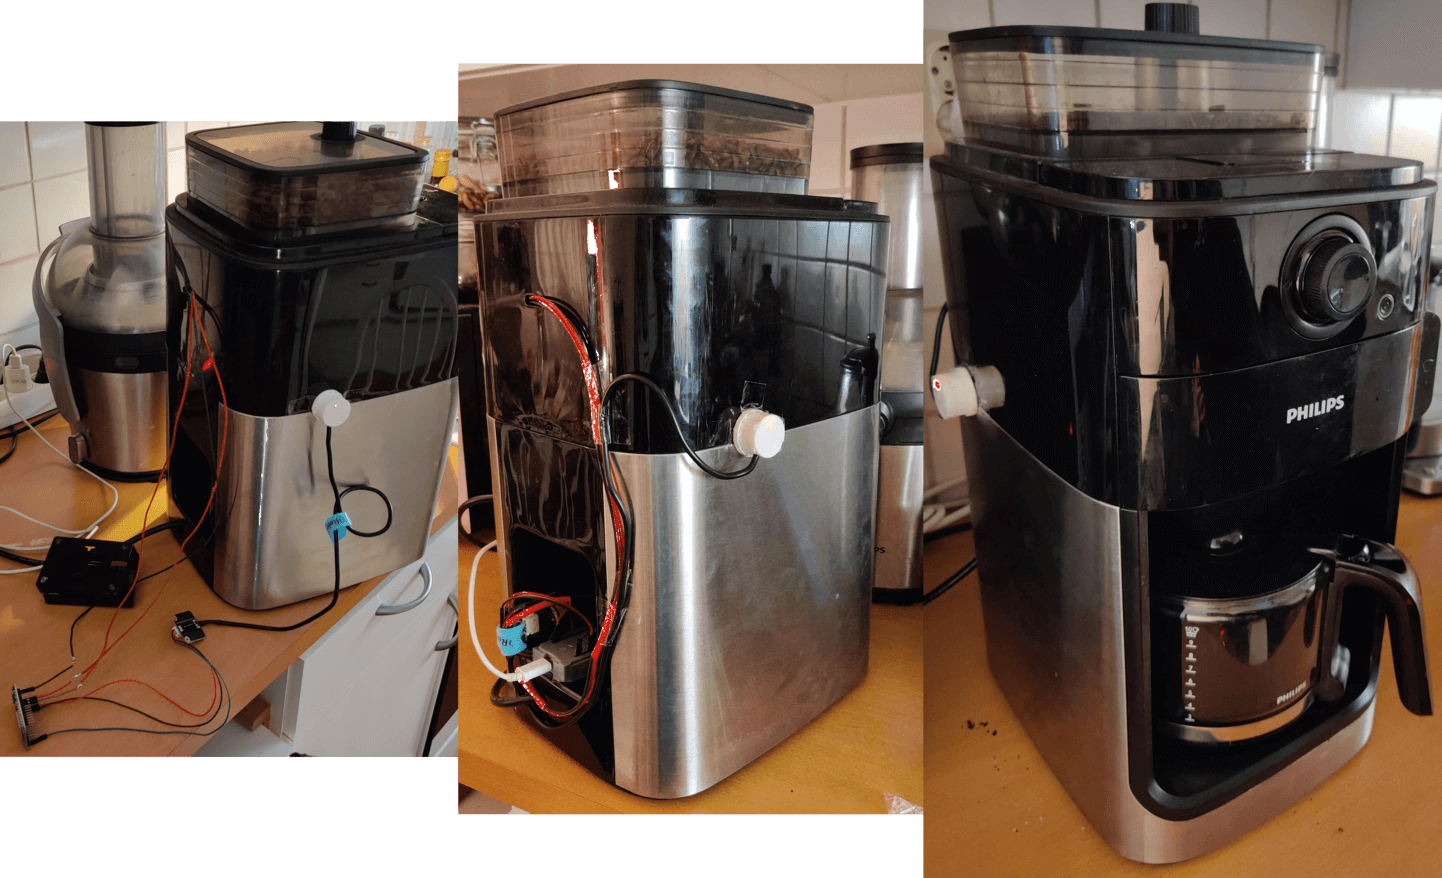
The ESP32 connected to the coffee machine and the water sensor
Finally, I had my coffee machine back in the game after one month.
Deployment
Start with the PIN’s you have on your ESP32 to adjust that (search for “pin:") in the esphome file I built for the coffee machine together with the cqrobot sensor. Use a USB cable for the first deployment to the ESP32, the rest of them can be done over wifi. If you use home assistant, follow the simple steps to add esphome integration. When that is done, the entities will automatically popup in home assistant. If you plan to only use the esphome exposed API’s, you can find the docs here.
Making the coffee machine smart
So, what do I mean by “smart”? From how I see it when I can connect the coffee machine to a something bigger. So, the key is to combine it with other sensors and triggers through the privacy first home automation, home assistant. I have been using it for almost four years and it is powerful and open. You can dig deeper into how to get started and the crazy amount of integrations.
The morning routine (or ritual)

During a 15 minute period, the wakeup routine starts with a emulated sunrise
For two years ago, I started with a wake-up routine. Waking up to an emulated sunrise with red, transforming to yellow and then to normal light over a period of fifteen minutes. After a while, the TV turns on and starts the morning music with Circle of life from the Lion king movie in the front. With this, I started my mornings with a smile and less grumpy.
Since I got the coffee machine a part of the home automation setup, I now start grind & brewing when a motion sensor is triggered outside of the bedroom. This is also switching the wakeup music to the morning news channel.
Work from home coffee breaks
This is a fun feature I tested but do not really use but worth sharing. By using the home assistant precense feature we can have used a state if a device or a person is home or on. This could be an app on your phone reporting GPS coordinates, your work laptop connected to your network. As I am using the ESP32 that controls the coffee machine, I can also use esphome report signal measurement for specific bluetooth device (smartwatch, phone etc.) and decide how close it is to the coffee machine. During a test I started the coffee machine during a timeslot and when presence of multiple devices but it’s not that useful as the WFH setup during the pandemic is in the kitchen close by the coffee machine.
Start by voice

During a 15 minute period, the wakeup routine starts with a emulated sunrise
You can use the [home assistant conversation](https://www.home-assistant.io/integrations/conversation/) from the computer or the app to start the coffee brewing by privacy first voice that by saying "turn on coffee maker". Honestly, the voice functionality in home assistant is limited, it's more a show then useful as you need to enter the conversation mode and then press the microphone.
But if you do not mind to having a voice assistant such as Alexa or google home in your home you can get use that to kick off the coffee and then it allots more useful.
Start by dropping the magic cube

Starting the grinding and brewing of the coffee by dropping the aquara magic cube
I have several Aquara Magic Cube and I use the drop motion to kick off the coffee machine. It’s a perfect motion when you are lazy and watching TV or in bed during the weekend when there is no wakeup routine.
Start through the app
This is the most used way we get our fresh coffee and it’s nice to kick off by the end of a power walk to have it ready and fresh when we enter our home. And honestly, sometimes when automation is introduced you quickly identify the corner cases when its get triggered. And Zhuowei Zhang is spot on on his tweet,
Never spend 6 minutes doing something by hand when you can spend 6 hours failing to automate it
— Zhuowei Zhang (@zhuowei) April 26, 2020
Security
Esphome does not (yet) support ssl/tls if you dont run a ESP8266 but it is a poor and unsecure implementation. I recommend having separate network segments for both the server & ESP32, firewall the communication and use separate wpa2 ssid for the device until there is a TLS feature.
Since I wrote the article, a lightweight transport encryption for the api have been added to Home Assistant 2021.10 and esphome 2021.9 A special high five to OttoWinter for the feature, now I am waiting for the same for mqtt ;-).
Safety
Don’t forget to turn on the “keep-warm” functionality on the coffee machine, this will make the appliance to automatically turn it self off after a set time. I highly recommend it to get a safety functionality outside of the code to take care of such if something would fail.
Creds
Creds goes to the home assistant & esphome team, platform, and frameworks they have built is fantastic and I hope I could drive more users to a privacy first setup and Peter for pushing me during several years to get into the microcontrollers and electronics.
PS. No ESP32 got killed or injured during the test, mine have been running fine with 4.3V for two months at the time of drafting this article. Btw, feel free to send a pull request to the article or reach out on twitter if you find any errors.